June 6, 2024
3 Rituals That Will Change Your Life!
Okay, the attention-grabbing subtitle could be a slight over-sell! Nevertheless, I think you’ll see there is a beauty to maintenance that can bring joy and satisfaction to those who do it. It goes along with the notion that as humans we are at our best as caregivers, fixers, and restorers. Studies in human health show that people who do mindful tasks and chores reap a series of benefits from a heightened sense of wellbeing to improved memory and creativity. So, consider these timber maintenance rituals as simply exercises in personal wellbeing!
Three Timber Rituals for Spring
1. Clean
Winter can be tough on home exteriors. Take a few minutes to do a “circle tour” of your
home and get a good look at your exterior timbers. If you wash your windows every spring,
this is also the perfect time to wash your timbers!
Prepare for Cleaning:
Two Buckets, 15L (3 gal), fill one with warm water, adding a few drops of mild
detergent. Fill the second with just warm water, for
rinsing.
Two microfiber cloths, large, one for each bucket.
Rubber gloves
Step-up / ladder to safely reach timbers.
Alternative for hard-to-reach spots: a soft bristle car
washing brush on an extension pole.
Cleaning Tips:
Let the microfiber cloth hold as much water as possible (“sopping wet”) for a first
pass over the upper faces of the timbers, allowing the excess water to help flush
away grit and dirt with the least possible amount of pressure. Repeat as necessary.
Once the dirt is gone, switch to the rinse water. Two rinse passes with a sopping
wet and then wrung out “damp” cloth will finish the cleaning.
Be sure to change water frequently. This will help you avoid streaking, so it’s worth
the effort!
Let the timbers air dry. Inspect for missed spots and assess the condition of the
topcoat.
2. Add a New Topcoat

You’ll know it is time to apply a new topcoat when the lustre of your finish is getting dull, or
the finish is beginning to look cloudy. Sun exposure is usually the key factor in how
frequently a new topcoat is needed. Timbers in a shady spot under a roof, may never
need more than a cleaning, while posts with a lot of sun exposure will need more regular
attention. Adding a topcoat is easy.
Preparing for recoating:
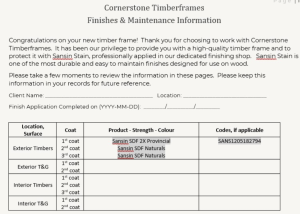
A can of Sansin SDF Topcoat, tinted to ¼ strength of your basecoat colour. You
can find this information on your “Finishes & Maintenance” page which is sent out to customers either before or just after a timber installation.
If you can’t find your stain information, call or email us, and we’ll be glad to look it up in our system.
Regular painting tools: brush or lambswool applicator, tray, drop sheet.
Fine sandpaper: 220 grit is ideal.
A tack cloth or damp microfiber cloth.
Tips for recoating:
If you completed the cleaning ritual you’re well on your way. If not, make sure
you’ve done that before continuing.
When your timbers are fully dry, use the fine 220 grit sandpaper to lightly scuff the
old finish. This will ensure good adhesion of the new topcoat.
Wipe down with your tack cloth / damp cloth to remove dust from the sanding step.
For applying a new topcoat, the ideal time and day is when your timbers are in
shade and when the winds are calm. Avoid applying in direct sun or on windy days
that will cause the finish to dry too quickly, leaving brush marks and dry lines.
Starting at the top, apply the Sansin Topcoat, back-brushing as you go to ensure an even coat. The idea here is to maintain what painters call “a wet edge”. The topcoat dries quickly so you want to complete a full face of a timber before stopping for a sip of coffee or answering a phone call. If you do pause mid-piece, you risk having a visible dry line, or obvious brush marks showing up in your finish.
Keep an eye for any runs, especially at corners or where two timbers meet. Back
brush these promptly.
You’re done! Wash up brushes with water.
3. Record
Quite possibly the easiest step… to forget!
What to record:
Use your phone and take photos of the areas you recoated. Not only does this feel good, but it will also help you remember the timbers you top coated and provide a
date for when you did the work.
Also write down the date and details on your “Finishes & Maintenance” page and
store that in your home projects file where you will easily find it again. Backups are always a good idea!
That’s it! Thanks for being the maintenance finishing hero that you are!
If you have any questions about timber maintenance, we’re here to help. We also enjoy hearing about our client experiences with maintaining their timbers. Be in touch and let us know about your experience.