Glulam & CLT- What’s the Difference?

The Building Blocks of Mass Timber

The spheres of architecture and construction are abuzz with the new ways that timber can be used in larger and higher buildings. “Mass Timber” provides faster builds, lighter foundations, more appealing spaces, and higher lease rates. It’s bringing heavy timber back to the forefront of modern design thanks to simple innovations in wood.

Let’s take a quick look at the two main ingredients in mass timber: glue-laminated timber (GLT or glulam), and cross-laminated timber (CLT).

Glulams have been around for over 100 years and grew rapidly in popularity and use in North America following WWII. Their first “golden age” occurred in the 1960’s when they were specified by architects in many civic, institutional and church projects.  Today, a second golden age is arriving for glulam, thanks to a new companion product: cross-laminated timber panels.

CLT’s were first used in construction in Europe in the 1990’s. They became available in North America in 2010 when Nordic Structures built its first CLT plant at Chibougamau, Quebec.
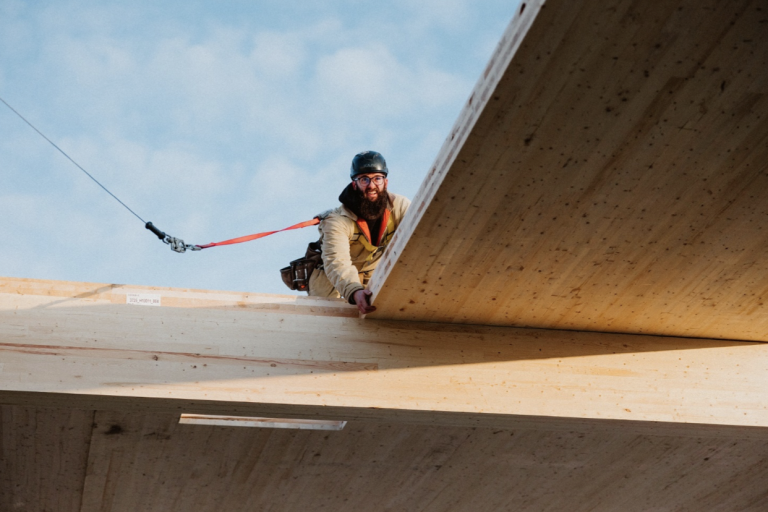
A Cornerstone installer guides a CLT to its final location atop Perimeter Aviation’s new Terminal Expansion.

Glulams and CLTs have several things in common. Both utilize small section lumber (lamella, lamstock), dried to 12% or less.  Both then use a combination of glue, heat, and pressure to bond the lamella together to create very large and long timber components.  The finished products have well-defined strength characteristics allowing them to span farther and carry loads greater than natural timbers.

The long lengths of both products rely on a process called “finger jointing” that takes short lamella pieces, cuts sharp zig-zags on their ends, applies glue and presses them together in a high-speed jointing line. The resulting joint is stronger than unjointed wood, increases the stability of the lamella and allows for lengths of 60’ and more.

Glulams orient their lamella in one direction, creating a big beam or column out of what essentially looks like a bundle of sticks or a stack of lumber.
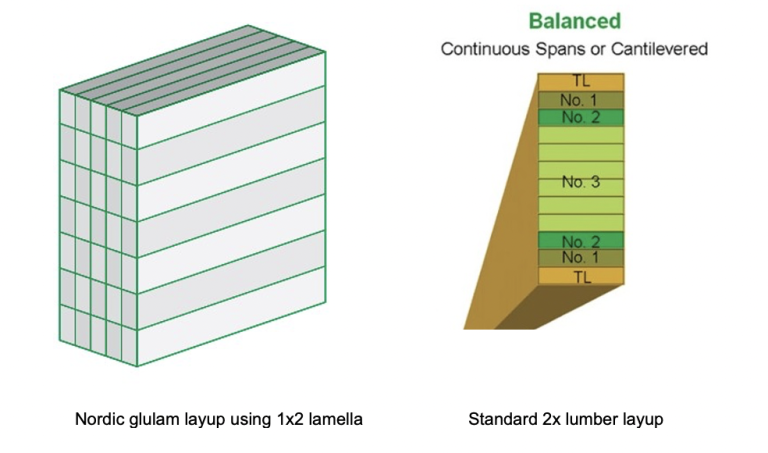
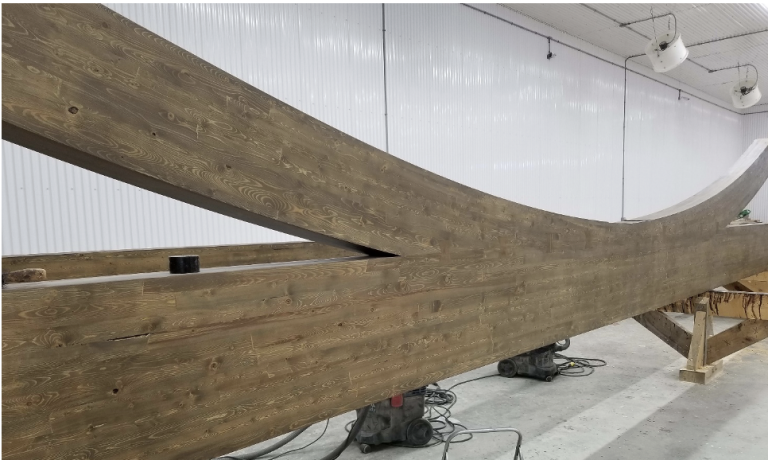
A set of Nordic glulam beams and arches are prepared at the Cornerstone finishing shop.

The CLT’s innovation seems so simple: orienting lamella layers crossways to each other. But that’s genius, taking an existing technique and using it to make something no one has yet imagined.
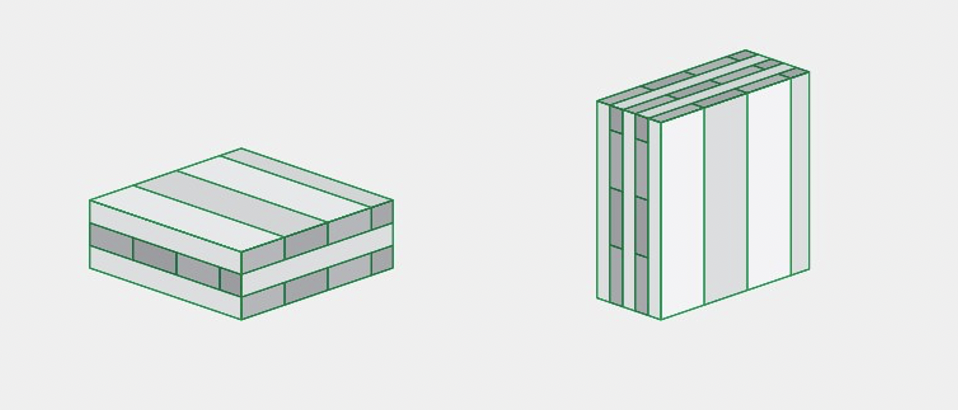
CLT lamellae are arranged with each layer running perpendicular to its neighbours to create bending strength in two directions.
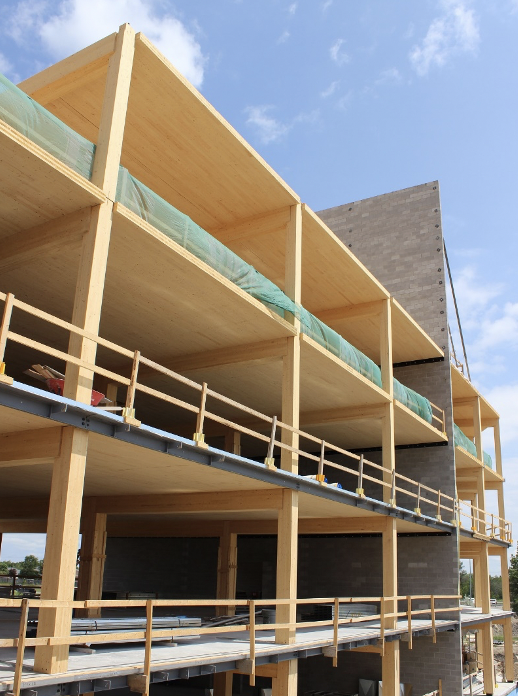
In many mass timber structures, glulams are used as columns and beams to support CLT floor and roof panels.

Bergen Gardens is a 6 storey, 149-unit, seniors’ apartment in Winnipeg, Manitoba, completed in 2023 with timber fabrication and install support provided by Cornerstone Timberframes.
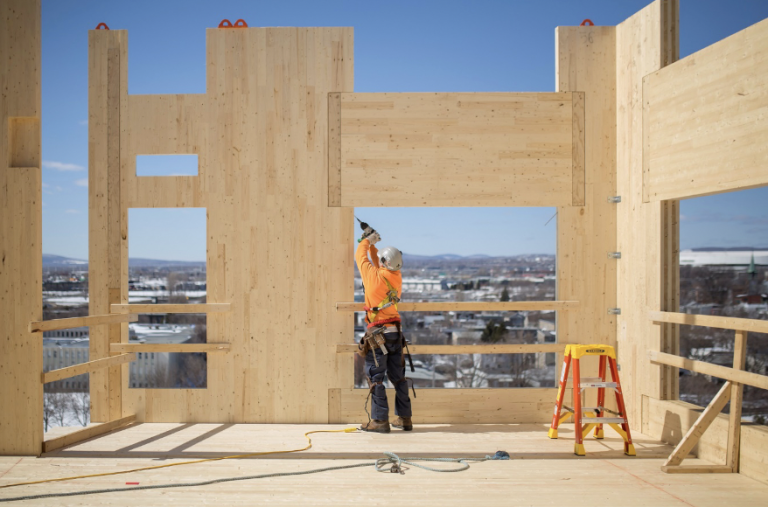
Quebec City: Origin is a 12-storey mass timber eco-apartment completed in 2017

For certain applications, CLTs can also be used on their own, with the CLTs acting as beams, columns and shear-resistant diaphragms.

Mass timber will continue to become more competitive with concrete, steel and “stick framing”.  In many markets, it’s already become the obvious choice, realizing higher lease rates and faster market uptake.
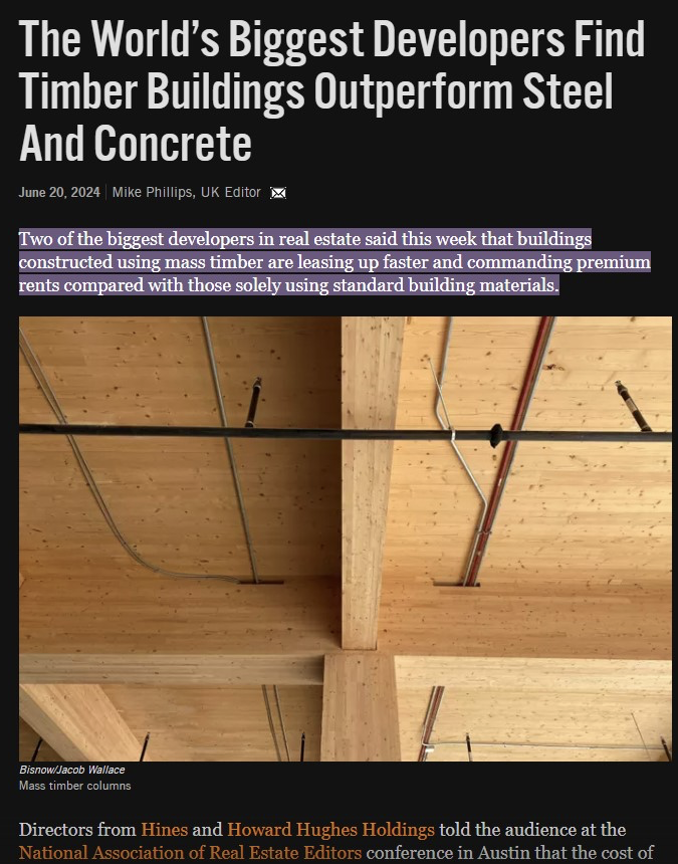
 Article in BISNOW, a leading webzine for the commercial real estate industry.

Are you an architect, developer or builder with a potential mass timber project?  Contact Cornerstone Timberframes today and let’s talk about how we can help you achieve big impacts with timber!

Maintaining Your Outdoor Timbers

3 Rituals That Will Change Your Life!

Okay, the attention-grabbing subtitle could be a slight over-sell! Nevertheless, I think you’ll see there is a beauty to maintenance that can bring joy and satisfaction to those who do it. It goes along with the notion that as humans we are at our best as caregivers, fixers, and restorers. Studies in human health show that people who do mindful tasks and chores reap a series of benefits from a heightened sense of wellbeing to improved memory and creativity. So, consider these timber maintenance rituals as simply exercises in personal wellbeing!

Three Timber Rituals for Spring
1. Clean
Winter can be tough on home exteriors. Take a few minutes to do a “circle tour” of your
home and get a good look at your exterior timbers. If you wash your windows every spring,
this is also the perfect time to wash your timbers!
Prepare for Cleaning:
 Two Buckets, 15L (3 gal), fill one with warm water, adding a few drops of mild
detergent. Fill the second with just warm water, for
rinsing.
 Two microfiber cloths, large, one for each bucket.
 Rubber gloves
 Step-up / ladder to safely reach timbers.
 Alternative for hard-to-reach spots: a soft bristle car
washing brush on an extension pole.
Cleaning Tips:
 Let the microfiber cloth hold as much water as possible (“sopping wet”) for a first
pass over the upper faces of the timbers, allowing the excess water to help flush
away grit and dirt with the least possible amount of pressure. Repeat as necessary.
 Once the dirt is gone, switch to the rinse water. Two rinse passes with a sopping
wet and then wrung out “damp” cloth will finish the cleaning.
 Be sure to change water frequently. This will help you avoid streaking, so it’s worth
the effort!
 Let the timbers air dry. Inspect for missed spots and assess the condition of the
topcoat.
2. Add a New Topcoat


You’ll know it is time to apply a new topcoat when the lustre of your finish is getting dull, or
the finish is beginning to look cloudy. Sun exposure is usually the key factor in how
frequently a new topcoat is needed. Timbers in a shady spot under a roof, may never
need more than a cleaning, while posts with a lot of sun exposure will need more regular
attention. Adding a topcoat is easy.

Preparing for recoating:

 A can of Sansin SDF Topcoat, tinted to ¼ strength of your basecoat colour. You
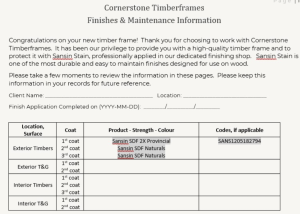
can find this information on your “Finishes & Maintenance” page which is sent out to customers either before or just after a timber installation.

If you can’t find your stain information, call or email us, and we’ll be glad to look it up in our system.
 Regular painting tools: brush or lambswool applicator, tray, drop sheet.
 Fine sandpaper: 220 grit is ideal.
 A tack cloth or damp microfiber cloth.
Tips for recoating:
 If you completed the cleaning ritual you’re well on your way. If not, make sure
you’ve done that before continuing.
 When your timbers are fully dry, use the fine 220 grit sandpaper to lightly scuff the
old finish. This will ensure good adhesion of the new topcoat.
 Wipe down with your tack cloth / damp cloth to remove dust from the sanding step.

 For applying a new topcoat, the ideal time and day is when your timbers are in
shade and when the winds are calm. Avoid applying in direct sun or on windy days
that will cause the finish to dry too quickly, leaving brush marks and dry lines.
 Starting at the top, apply the Sansin Topcoat, back-brushing as you go to ensure an even coat. The idea here is to maintain what painters call “a wet edge”. The topcoat dries quickly so you want to complete a full face of a timber before stopping for a sip of coffee or answering a phone call. If you do pause mid-piece, you risk having a visible dry line, or obvious brush marks showing up in your finish.
 Keep an eye for any runs, especially at corners or where two timbers meet. Back
brush these promptly.
 You’re done! Wash up brushes with water.

3. Record
Quite possibly the easiest step… to forget!
What to record:
 Use your phone and take photos of the areas you recoated. Not only does this feel good, but it will also help you remember the timbers you top coated and provide a
date for when you did the work.
 Also write down the date and details on your “Finishes & Maintenance” page and
store that in your home projects file where you will easily find it again. Backups are always a good idea!

That’s it! Thanks for being the maintenance finishing hero that you are!

If you have any questions about timber maintenance, we’re here to help. We also enjoy hearing about our client experiences with maintaining their timbers. Be in touch and let us know about your experience.

Care, Curiosity & Joy

Care, Curiosity & Joy

An interview with Gary Snider.

Reflecting on the principles that guide our work with clients…

On the Importance of Being Acknowledged

I’m not an extrovert, so stepping into a new social setting where I don’t recognize anyone, brings a sense of vulnerability.  What a difference it makes when someone steps out of the crowd and welcomes me!  That one, simple act of acknowledgement changes everything that follows – it opens the door to real connection.

It still surprises me when clients phone and say they’re delighted that we answered their call or returned their message so quickly.  Isn’t this what every business does?  I can’t imagine offering a high-quality product and not prioritizing the customer experience, not only in that first contact but day by day.  I think it’s the natural outcome of experiencing care ourselves.

Understanding is Foundational


The basis for trust is the assurance that you are understood.  I first encountered Cornerstone as a client and was impressed with how they listened, the perceptive questions and their genuine interest in the details of my project.  That experience brought me back to Cornerstone a few years later and I’ve enjoyed building on the notion that listening well is a joy for both parties to a conversation.  If you’re truly focused on understanding someone, you’ll always find a fascinating person in front of you.  The beauty of seeing every person as worthwhile and interesting is that it’s nearly always a reciprocal experience.

Sites & Possibilities

In my experience, every designer worth their wage will want to visit your building site.  With the advent of easily accessible maps, aerial photos and “street views” there may be an argument for letting those replace a site visit, especially if the location is remote.  As helpful as those can be, they are a weak substitute for walking the site with the client, taking in views, the sun, sky, and lay of the land.  Visits to building sites can be memorable because the conversations and experiences at the site often give rise to ideas that improve a design.

Right-Sizing

It’s often hard for designers and tradespeople to ask about client budgets up-front.  Having that important conversation early ensures buildable designs and more comfortable conversations around features and options.  Over the years, I’ve seen a pattern that is now highly predictable:  if a client’s current home or cottage has an awkward, too-small space, the design for the new place will be at risk of oversizing that same space.  Kitchens, foyers, main bedrooms, and garages top the list.  Again, a designer who is empowered to ask questions is your best guide to getting a “right-sized” result.

Beauty

 One of my favourite things to discover is a client’s aesthetic preferences.  Just like food or art, the visual impact of a physical space exists on a continuum (and often several) – rustic to refined, traditional to modern, detailed to minimalist, hidden to visible… and more.  Some clients love an industrial vibe where metal plates and bolts are celebrated, others are drawn to clean Scandinavian lines. 

Over 32 years, we’ve done it all.  The vision for the aesthetic goal comes from conversation, the sharing of inspirational images and those ideas that arise from the site itself.  For clients who can’t quite imagine what a finished space will look like, the power of 3D rendering makes the “yet-to-be” visible and almost real.

Happiness in my work comes from serving people, getting to know what’s important to them, and playing a part in helping them achieve the best outcomes.  It takes curiosity and care.  When done well, the reward is joy.

If you’re considering a timber frame or mass timber project, get in touch:  204.377.5000, info@cstf.ca